Sales Hub Overview

Dashboard -> Sales Hub

Sales Tutorials - Sales Hub Overview.png

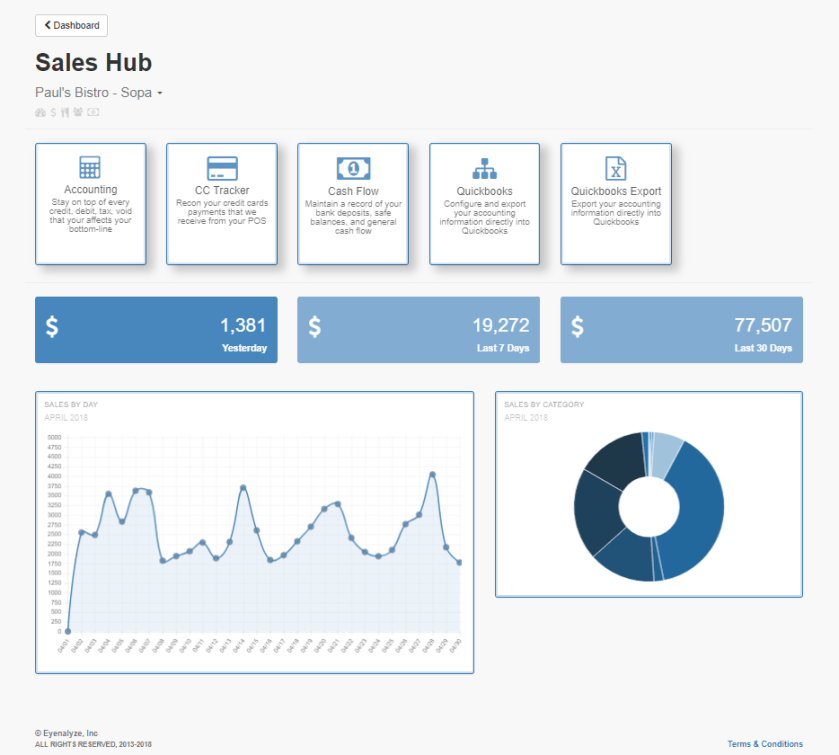
The Sales Hub is the home for accounting and cash flow functionality.  Within the Sales Hub there is the Accounting, Credit Card Tracker, Cash Flow, Quickbooks, and Quickbooks Export Fuse.  

The Accounting Fuse provides a summary of transactions including net sales, voids, and payments due, along with more information used for accounting purposes.

The Credit Card Tracker Fuse reconciles credit card sales from a POS with data from the credit card payment processor to verify totals.  

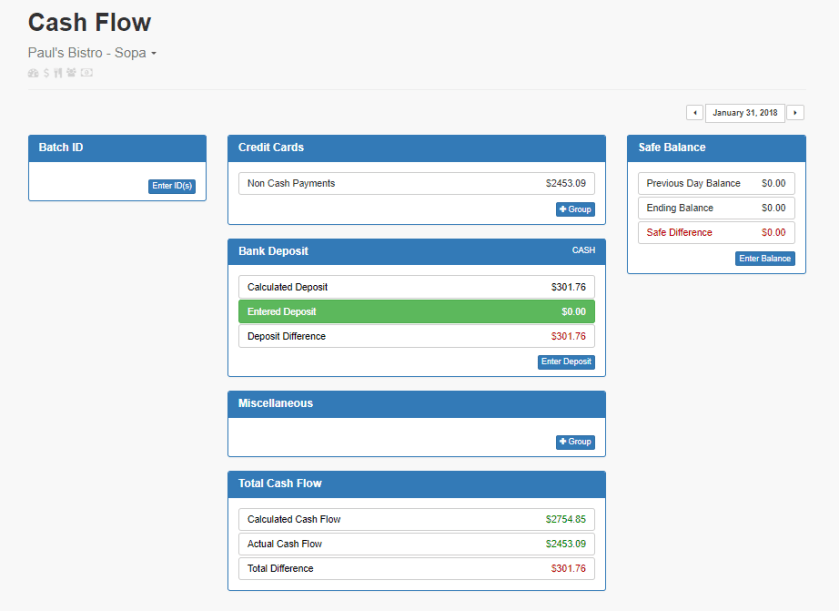
The Cash Flow Fuse (also commonly called a cash count or cash audit) provides information on day to day operations within a restaurant.  

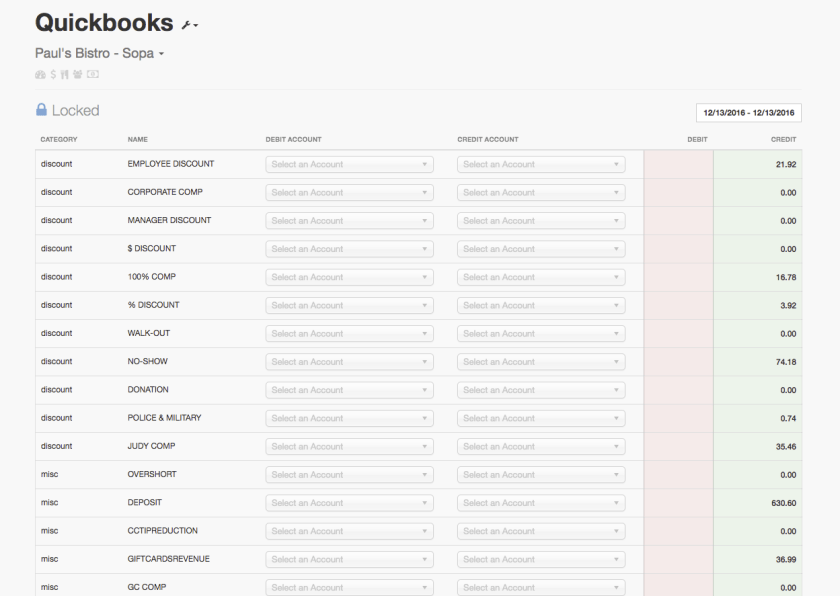
The Quickbooks Fuse manages the chart of accounts for a restaurant, as well as importing and exporting data to accounting software, such as Quickbooks.

The Quickbook Exports Fuse automatically downloads a restaurant’s accounting information to a .iif file.  

Sales Accounting Fuse Overview

Dashboard -> Sales Hub -> Accounting Fuse

Sales Tutorials - Accounting Overview.png

The Accounting Fuse is the home for data involving POS transactions, including a breakdown of net sales, taxes, gift card revenue, voids, discounts, tips, payments, petty cash, and daily deposits, all resulting in an accurate Over / Under.  

Cash Flow, CC Radar, Quickbooks, and Quickbooks Export can all be accessed from the Edit Menu in the Accounting Fuse.

Sales Cash Flow Fuse Overview

Dashboard -> Sales Hub -> Cash Flow Fuse

Sales Tutorials - Cash Flow Overview.png

The Cash Flow Fuse provides information on day to day operations within a restaurant.  

Batch IDs can be entered in the Batch ID box.    

The Credit Cards box summarizes credit card transactions.  

Bank deposits can be entered in the Bank Deposit box, and any difference in calculated and entered deposits will appear here.  

The Miscellaneous box will show any other remaining transactions.

The Total Cash Flow box shows your calculated cash flow, actual cash flow, and the total difference.

Safe balances can be entered in the Safe Balance box to verify that cash is correct.  

How to Set Up Cash Flow

Dashboard → Sales → Cash Flow Fuse

Sales Tutorials - Cash Flow Overview.png

Once Eyenalyze is receiving data from a restaurant’s POS, the next steps to set up cash flow are to add credit card groups, house accounts, and initial safe balance.

Group credit cards by deposit information in the Credit Cards box.  For example, MasterCard, Discover, and Visa would be named WorldPay, if that is the credit card merchant.

Create payment groups, such as House Account, in the Miscellaneous box.  

Finally, Enter the initial safe balance in the Safe Balance box.  

Completing these three fields will set up a restaurant’s cash flow in Eyenalyze.

Sales Quickbooks Fuse “Basic View” Overview

Dashboard -> Sales Hub -> Quickbooks

Screen Shot 2018-05-16 at 7.19.02 PM.png

The Quickbooks Fuse is the home for a restaurant’s chart of accounts.  This page is displayed in the “Basic View” by default.

The Quickbooks Fuse allows users to view and edit a restaurant’s chart of accounts.  While editing the chart of accounts, you do not have to save after each adjusted entry, but you will need to select “Save Changes” in the bottom right corner to apply your changes.  

If a restaurant needs more options to edit the accounting that goes into the calculations on the Eyenalyze platform, see the tutorial on How to use the Advanced Accounting View.  

How to Upload a Chart of Accounts

Sales -> Quickbooks -> Edit Menu -> Quickbooks Upload

Sales Tutorials - Uploading a Chart of Accounts.png

The first step for setting up accounting features in Eyenalyze is to upload a chart of accounts.  The Edit Menu in the Quickbooks Fuse allows for a Quickbooks Upload. There is an option to browse files and locate a chart of accounts, which should be a .iif file, the standard for importing and exporting in Quickbooks.  After uploading the chart of accounts file, save changes, and the Quickbooks Fuse will populate with the chart of accounts.

The final step is to map the chart of accounts.  This step is only required to be completed once for a restaurant.  You do not have to save after each entry, but you must save in order to apply the changes.  

If more advanced accounting options are needed, please see the tutorial on using the Advanced Accounting view.

How to use the Advanced Accounting View

advanced-view-ss

Eyenalyze offers an Advanced Accounting view which displays a more robust view of the accounting that goes into your restaurant’s data.  If you have already mapped your chart of accounts in the basic view, then you will not need to repeat this step in the advanced view, or you can map your chart of accounts directly using the advanced view.  

Sales -> Quickbooks -> Edit Menu -> Advanced View

To switch to the Advanced Accounting view, go to the Sales Hub, and select Quickbooks.  Then go to the edit menu and select Advanced View.  The first thing you will need to do before you can edit your chart of accounts is unlock the features by clicking the padlock in the top left corner.  The Advanced Accounting page adds three core features that lets you customize how your accounting system operates.  

The first feature is you can edit whether an entry is a debit, credit, or both.  You can do this by dragging the box into the debit or credit square.  You can delete a box by selecting the small “x” in the corner.  

The second feature is the ability to hide items.  This would occur if you are no longer using an item and you do not want it to show in the system or on your balance sheet.  

The third feature is at the bottom you will see total columns for your debits and credits.  These totals should equal out to zero.  We encourage you to involve your accountant or controller in that process so it is accurate.  When you are finished working, go back to the padlock in the top left corner to lock the page, and doing so will save your changes.