Inventory Invoices Fuse Overview

Dashboard -> Inventory Hub -> Invoices

The Invoices Fuse is the home for all electronic, manual, and transferred invoices.  

Invoices are populated according to the date range set at the top of the page.  On the left side of the Invoice Info box is the invoice date, invoice number, and vendor information.  Under the total column is the total for the invoice. Some invoice totals will be a negative number because Eyenalyze records credits along with purchases from a vendor.  

Manual invoices are specified in the bottom right corner of the Invoice Info box with the name of the user responsible for entry.  

The Import Invoice dropdown menu allows for a Vendor Order Guide, PFG Menu Analysis, Clarifiable Menu Analysis, and Import History.  

To create a Manual Invoice select “Create Manual Invoice” towards the top right corner.  For more information on manual invoices, please view the How to Create a Manual Invoice tutorial.  

How to Create a Manual Invoice

Dashboard -> Inventory Hub -> Invoices -> Create Manual Invoice

Inventory Tutorials - How to Upload an Order Guide (Manual Invoice).png

Most restaurants do not buy all of their inventory from a single vendor, so Eyenalyze allows for manual invoice entries to accommodate purchases not automatically integrated with the platform.  

To create a manual invoice, enter the vendor name, invoice number, and invoice date.  Then select “Add Item…” to add items to the invoice. The Add Item popup box provides a blank sheet for any ingredient or product.  It is best practice to use the vendor’s product code in Eyenalyze so the platform can recall previous entries to save time.

Previous manual invoices can be edited or used as a starting point for a new invoice by selecting “Load…”

Inventory Zones, Count, and History Fuse Overview

Dashboard -> Inventory Hub

The Zones, Count, and History fuse work together to manage a restaurant’s inventory.  

The Zones fuse is used to initially organize ingredients by area or shelf, such as “Freezer” or “Custodial”.  Sorting items stored in the same area or shelf in the same zone allows for an employee taking inventory to quickly select the zone, and count the items.  For more information on zones, see the tutorial on How to Create, Edit, and Delete Zones.

The Count fuse is used after setting up zones.  The Eyenalyze Count System allows users to quickly count items and ingredients in the restaurant for inventory purposes.  For more information on how to take a count, see the tutorial How to Take a Count.

After a Count is taken it will appear in the History Fuse.  The History Fuse is a complete record of all past inventory counts to be viewed and managed.

How to Create, Edit, and Delete Zones

Dashboard -> Inventory Hub -> Zones

The Zones Fuse manages a restaurant’s zones.  

To create a new zone, in the Zones box select “New…” and the new zone popup box will appear.  Enter the name for the new zone, then select done. The new zone will appear in the zones box.  

To add items to a zone, first select the zone, then at the bottom select “Add Item(s)”.  The Add Items popup box will appear. Specific ingredients can be searched, or a user can scroll through and select ingredients sorted by category.  After selecting items to be added to the zone, press “Add Item(s)” and the ingredients will be added to the zone.

To remove an item from a zone select the red trash can to the right of the item.  To delete a zone, select the zone, then at the bottom select “Delete Zone”.

How to Take a Count

Dashboard -> Inventory Hub -> Count

When using Eyenalyze, we refer to the action of counting a restaurant’s inventory as taking a count.  

The Count Fuse acts as a clipboard when taking a count.  Begin by adding a zone: select Add, and the Add Item dialog box will appear, then select the category or zone being counted.  Specific items can be added, or at the bottom select “Load Zone” to add every item in that zone to the clipboard.

When taking a count, select the item and enter the item count.  Users can enter whole cases, whole packs, partial packs, or a combination depending on the item.  

Once finished taking the count, we recommend removing all zero items from the clipboard before hitting submit.  To remove all zero items select “Remove” and choose “All Zero Items”. To finish the count select “Submit” and the options dialog box will appear.  Enter a signature and any notes for the count. When finished, hit Submit.

After hitting submit the user will be taken to a review page for the count with an assortment of information to be reviewed to ensure the count was accurate.  

All counts can be viewed in the History Fuse in the Inventory Hub.

Inventory Hub – Menu Fuse – Overview

Dashboard -> Inventory Hub -> Menu Fuse

The Menu Fuse allows users to view menu items, recipes, and evaluate how they have changed over time.

ss menu fuse last 30 days box.png

The Last 30 Days box shows information for top menu items with linked recipes.  The Sales tab shows total sales, the Quantity tab shows quantity sold, and the Profit tab shows profit gained from each menu item.  This is calculated by subtracting food costs from sales for each item.

Below the Last 30 Days box are menu categories.  These are the same categories shown under the Sales Tab on the Dashboard.  Each category can be expanded to see the menu items within that category. Each menu item with a linked recipe has a food cost percentage shown on the right side of the chart.  If the food cost is less than 35% of the sales price on the menu item then the bar will appear green. If the food cost percentage exceeds 35% the bar will turn yellow, and if the food cost percentage exceeds 40% the bar will turn red.  If a menu item does not have a recipe linked then “No Recipe” will populate instead of a percentage.

ss menu items.png

Each menu item with a recipe can also be expanded to see further analytics.  Under the recipes tab a breakdown of the ingredients and how much each item currently costs to produce is shown, as well as a graph showing the history of the total cost for that menu item.  A history of the cost for each ingredient for the menu item can be viewed below the graph.

ss recipe analytics.png

The pricing tab shows how the food cost percentage is calculated, along with price settings.

ss menu item pricing.png

The Stats tab shows further statistics for the menu item, including graphs for the quantity sold and sales information at each price for the last 30 days.  Below the graphs are charts showing information for yesterday, the last 15 days, and the last 30 days.

ss menu item stats.png


Cutboard – How to Create and Link Plate Recipes

Dashboard -> Inventory Hub -> Cutboard Fuse

In order to create and link plate recipes to menu items you must already have menu items created.  If you do not have menu items for your restaurant, or you do not know how to create custom menu items, please see the tutorial on “How to Create a Custom Menu Item.”

how-to-create-and-link-recipes-ss-1

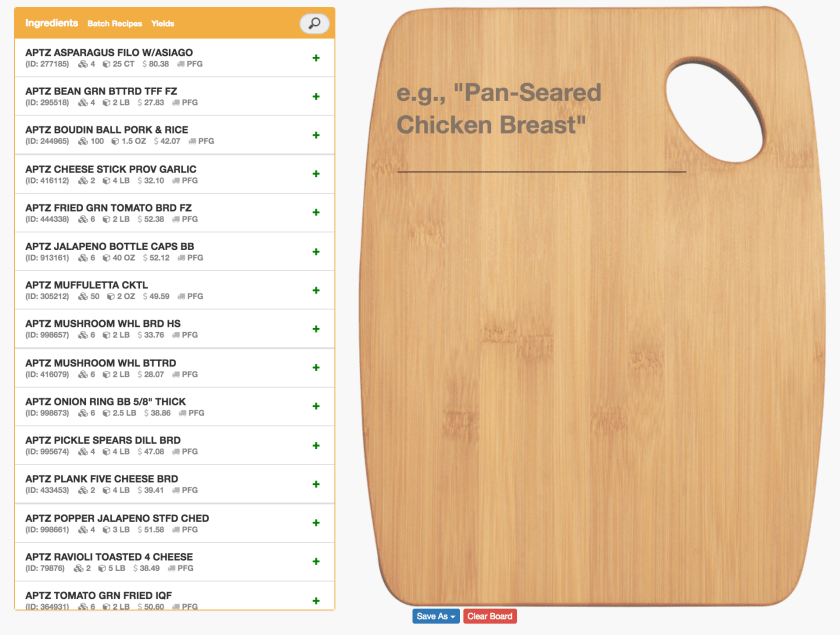
Creating and linking recipes for menu items is managed in the Inventory Hub’s Cutboard Fuse.  To create a new recipe, simply enter your recipe name at the top of the cutboard, then you can begin adding ingredients by searching your ingredients, batch recipes, and yields in the box to the left of the cutboard.  Select the green plus sign to the right of the ingredient to add it to the cutboard.  

Once ingredients have been added to the cutboard, users can edit the amount used and the unit of measurement for each ingredient, which will then be used to show the total cost to make that recipe.  

how-to-create-and-link-recipes-ss-2

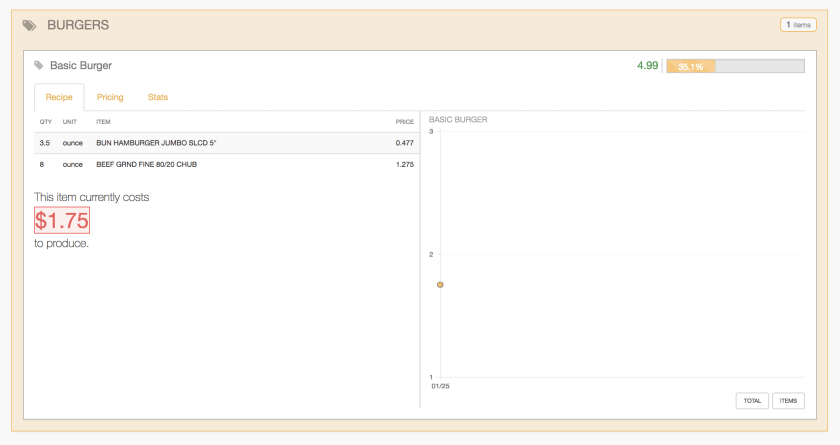
Above is an example recipe for a Basic Burger that has 8 ounces of ground beef and a bun (we know that this particular bun is 3.5 ounces from the invoice information, which can be viewed below each ingredient in the add ingredients box to the left) which results in a total recipe cost of $1.75.  

To save a recipe and link it to a menu item, below the cutboard select “Save As” then select “Plate Recipe.”  The Select Associated POS Item dialog box will appear.  Locate the menu item that you wish to link your recipe to, select it, then select Link.  

how-to-create-and-link-recipes-ss-3

Your linked recipe will then appear at the bottom of the page under “Plate Recipes.”  If it does not appear right away, please refresh your page.  

how-to-create-and-link-reicpes-ss-4

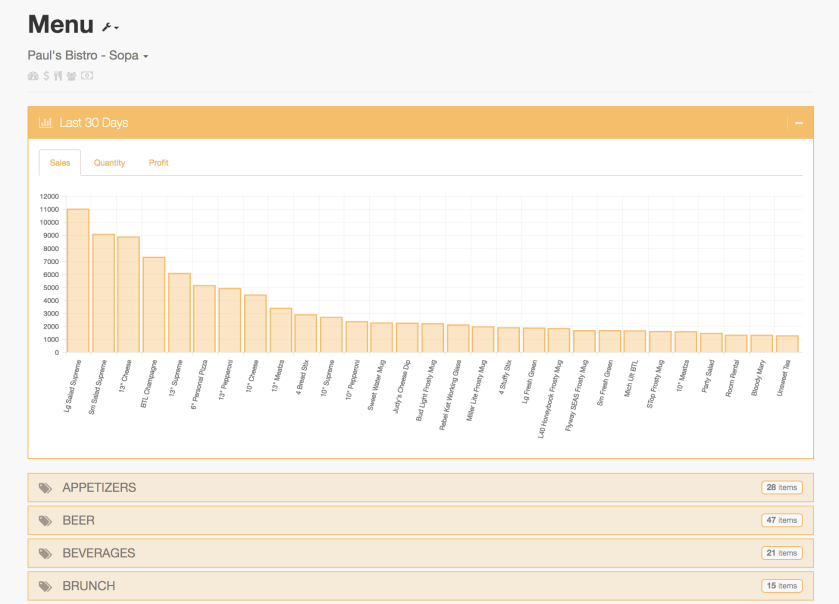
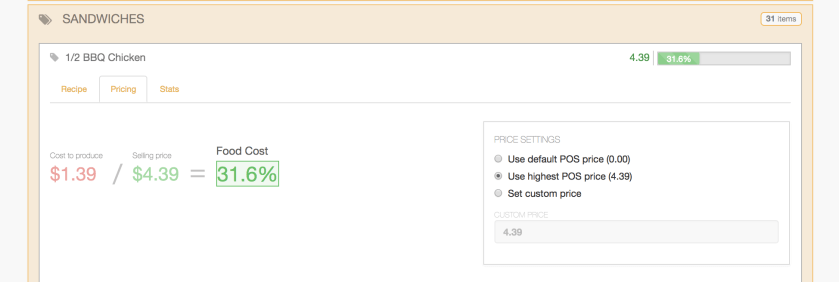
Once a recipe has been linked to a menu item, users can view plate costing analytics for the menu item in the Inventory Hub’s Menu Fuse.  

how-to-create-and-link-recipes-ss-5


How to Create a Custom Menu Item

how to create custom menu items ss 1.png

Dashboard -> Inventory Hub -> Menu Fuse -> Edit Menu -> Categories

To create a custom menu item, go to the Inventory Hub, then go to the Menus fuse.  

In the top right you can select “Create Menu Item” to create a custom menu item.  The Custom Menu Item dialog box will appear.  You can then specify the Name, POS ID, Category, and Price Sold At for the custom menu item.  

how-to-create-custom-menu-items-ss-2

Once a custom menu item has been created, it will appear in the Menus fuse, and you can link a recipe to it to enable plate costing features.  

If you do not know how to link a menu item to a recipe, please see the tutorial on “How to Create and Link Recipes.”