How to Set Up Cash Flow

Dashboard → Sales → Cash Flow Fuse

Sales Tutorials - Cash Flow Overview.png

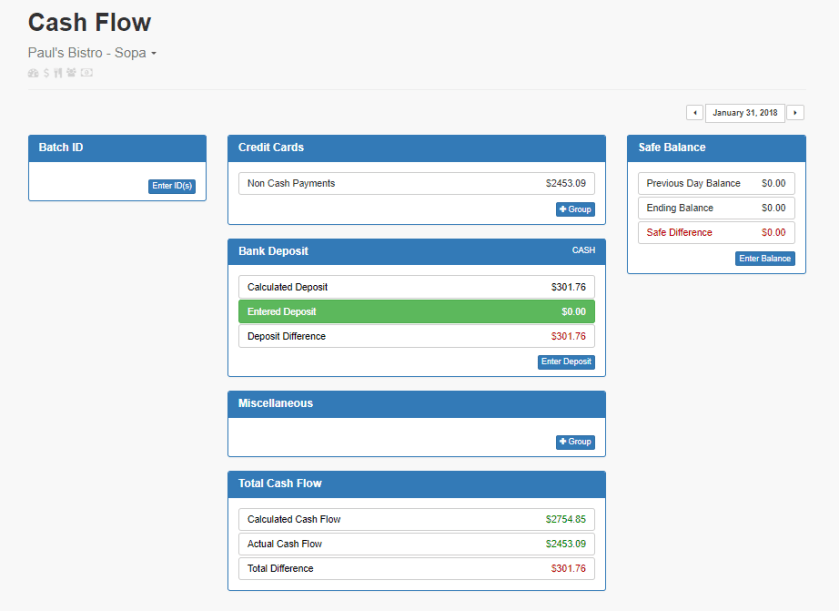
Once Eyenalyze is receiving data from a restaurant’s POS, the next steps to set up cash flow are to add credit card groups, house accounts, and initial safe balance.

Group credit cards by deposit information in the Credit Cards box.  For example, MasterCard, Discover, and Visa would be named WorldPay, if that is the credit card merchant.

Create payment groups, such as House Account, in the Miscellaneous box.  

Finally, Enter the initial safe balance in the Safe Balance box.  

Completing these three fields will set up a restaurant’s cash flow in Eyenalyze.

Sales Quickbooks Fuse “Basic View” Overview

Dashboard -> Sales Hub -> Quickbooks

Screen Shot 2018-05-16 at 7.19.02 PM.png

The Quickbooks Fuse is the home for a restaurant’s chart of accounts.  This page is displayed in the “Basic View” by default.

The Quickbooks Fuse allows users to view and edit a restaurant’s chart of accounts.  While editing the chart of accounts, you do not have to save after each adjusted entry, but you will need to select “Save Changes” in the bottom right corner to apply your changes.  

If a restaurant needs more options to edit the accounting that goes into the calculations on the Eyenalyze platform, see the tutorial on How to use the Advanced Accounting View.  

How to Upload a Chart of Accounts

Sales -> Quickbooks -> Edit Menu -> Quickbooks Upload

Sales Tutorials - Uploading a Chart of Accounts.png

The first step for setting up accounting features in Eyenalyze is to upload a chart of accounts.  The Edit Menu in the Quickbooks Fuse allows for a Quickbooks Upload. There is an option to browse files and locate a chart of accounts, which should be a .iif file, the standard for importing and exporting in Quickbooks.  After uploading the chart of accounts file, save changes, and the Quickbooks Fuse will populate with the chart of accounts.

The final step is to map the chart of accounts.  This step is only required to be completed once for a restaurant.  You do not have to save after each entry, but you must save in order to apply the changes.  

If more advanced accounting options are needed, please see the tutorial on using the Advanced Accounting view.

Inventory Invoices Fuse Overview

Dashboard -> Inventory Hub -> Invoices

The Invoices Fuse is the home for all electronic, manual, and transferred invoices.  

Invoices are populated according to the date range set at the top of the page.  On the left side of the Invoice Info box is the invoice date, invoice number, and vendor information.  Under the total column is the total for the invoice. Some invoice totals will be a negative number because Eyenalyze records credits along with purchases from a vendor.  

Manual invoices are specified in the bottom right corner of the Invoice Info box with the name of the user responsible for entry.  

The Import Invoice dropdown menu allows for a Vendor Order Guide, PFG Menu Analysis, Clarifiable Menu Analysis, and Import History.  

To create a Manual Invoice select “Create Manual Invoice” towards the top right corner.  For more information on manual invoices, please view the How to Create a Manual Invoice tutorial.  

How to Create a Manual Invoice

Dashboard -> Inventory Hub -> Invoices -> Create Manual Invoice

Inventory Tutorials - How to Upload an Order Guide (Manual Invoice).png

Most restaurants do not buy all of their inventory from a single vendor, so Eyenalyze allows for manual invoice entries to accommodate purchases not automatically integrated with the platform.  

To create a manual invoice, enter the vendor name, invoice number, and invoice date.  Then select “Add Item…” to add items to the invoice. The Add Item popup box provides a blank sheet for any ingredient or product.  It is best practice to use the vendor’s product code in Eyenalyze so the platform can recall previous entries to save time.

Previous manual invoices can be edited or used as a starting point for a new invoice by selecting “Load…”

Inventory Zones, Count, and History Fuse Overview

Dashboard -> Inventory Hub

The Zones, Count, and History fuse work together to manage a restaurant’s inventory.  

The Zones fuse is used to initially organize ingredients by area or shelf, such as “Freezer” or “Custodial”.  Sorting items stored in the same area or shelf in the same zone allows for an employee taking inventory to quickly select the zone, and count the items.  For more information on zones, see the tutorial on How to Create, Edit, and Delete Zones.

The Count fuse is used after setting up zones.  The Eyenalyze Count System allows users to quickly count items and ingredients in the restaurant for inventory purposes.  For more information on how to take a count, see the tutorial How to Take a Count.

After a Count is taken it will appear in the History Fuse.  The History Fuse is a complete record of all past inventory counts to be viewed and managed.

How to Create, Edit, and Delete Zones

Dashboard -> Inventory Hub -> Zones

The Zones Fuse manages a restaurant’s zones.  

To create a new zone, in the Zones box select “New…” and the new zone popup box will appear.  Enter the name for the new zone, then select done. The new zone will appear in the zones box.  

To add items to a zone, first select the zone, then at the bottom select “Add Item(s)”.  The Add Items popup box will appear. Specific ingredients can be searched, or a user can scroll through and select ingredients sorted by category.  After selecting items to be added to the zone, press “Add Item(s)” and the ingredients will be added to the zone.

To remove an item from a zone select the red trash can to the right of the item.  To delete a zone, select the zone, then at the bottom select “Delete Zone”.

How to Take a Count

Dashboard -> Inventory Hub -> Count

When using Eyenalyze, we refer to the action of counting a restaurant’s inventory as taking a count.  

The Count Fuse acts as a clipboard when taking a count.  Begin by adding a zone: select Add, and the Add Item dialog box will appear, then select the category or zone being counted.  Specific items can be added, or at the bottom select “Load Zone” to add every item in that zone to the clipboard.

When taking a count, select the item and enter the item count.  Users can enter whole cases, whole packs, partial packs, or a combination depending on the item.  

Once finished taking the count, we recommend removing all zero items from the clipboard before hitting submit.  To remove all zero items select “Remove” and choose “All Zero Items”. To finish the count select “Submit” and the options dialog box will appear.  Enter a signature and any notes for the count. When finished, hit Submit.

After hitting submit the user will be taken to a review page for the count with an assortment of information to be reviewed to ensure the count was accurate.  

All counts can be viewed in the History Fuse in the Inventory Hub.