Inventory Hub – Menu Fuse – Overview

Dashboard -> Inventory Hub -> Menu Fuse

The Menu Fuse allows users to view menu items, recipes, and evaluate how they have changed over time.

ss menu fuse last 30 days box.png

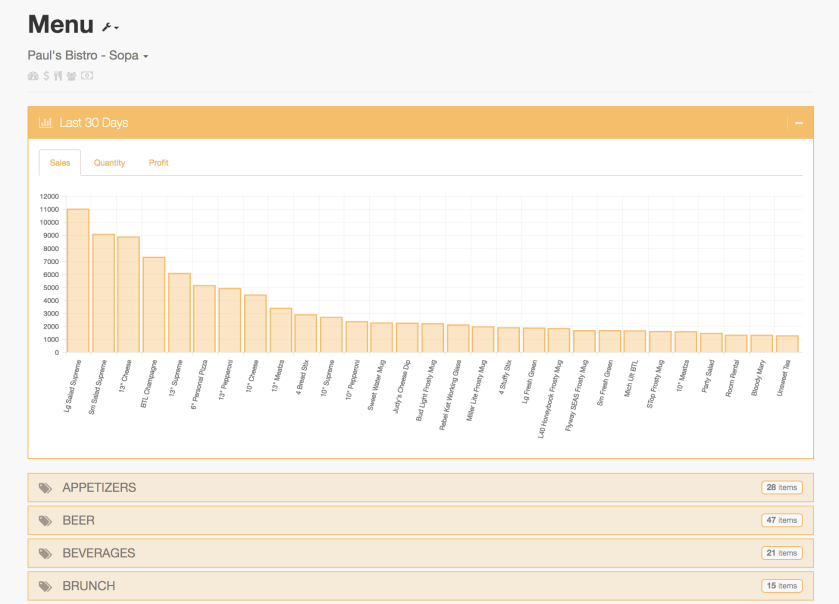
The Last 30 Days box shows information for top menu items with linked recipes.  The Sales tab shows total sales, the Quantity tab shows quantity sold, and the Profit tab shows profit gained from each menu item.  This is calculated by subtracting food costs from sales for each item.

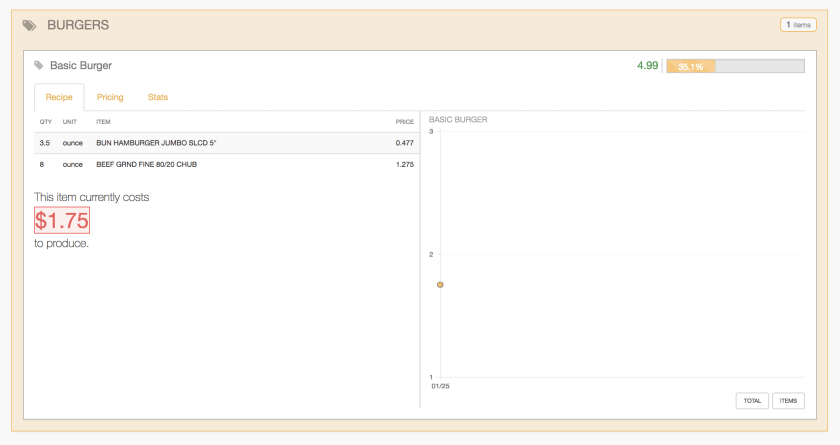
Below the Last 30 Days box are menu categories.  These are the same categories shown under the Sales Tab on the Dashboard.  Each category can be expanded to see the menu items within that category. Each menu item with a linked recipe has a food cost percentage shown on the right side of the chart.  If the food cost is less than 35% of the sales price on the menu item then the bar will appear green. If the food cost percentage exceeds 35% the bar will turn yellow, and if the food cost percentage exceeds 40% the bar will turn red.  If a menu item does not have a recipe linked then “No Recipe” will populate instead of a percentage.

ss menu items.png

Each menu item with a recipe can also be expanded to see further analytics.  Under the recipes tab a breakdown of the ingredients and how much each item currently costs to produce is shown, as well as a graph showing the history of the total cost for that menu item.  A history of the cost for each ingredient for the menu item can be viewed below the graph.

ss recipe analytics.png

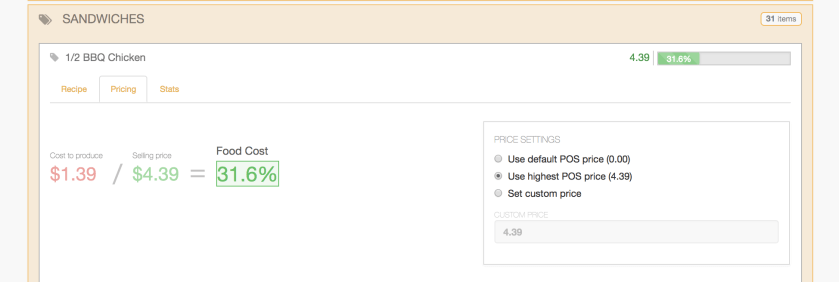
The pricing tab shows how the food cost percentage is calculated, along with price settings.

ss menu item pricing.png

The Stats tab shows further statistics for the menu item, including graphs for the quantity sold and sales information at each price for the last 30 days.  Below the graphs are charts showing information for yesterday, the last 15 days, and the last 30 days.

ss menu item stats.png


Cutboard – How to Create and Link Plate Recipes

Dashboard -> Inventory Hub -> Cutboard Fuse

In order to create and link plate recipes to menu items you must already have menu items created.  If you do not have menu items for your restaurant, or you do not know how to create custom menu items, please see the tutorial on “How to Create a Custom Menu Item.”

how-to-create-and-link-recipes-ss-1

Creating and linking recipes for menu items is managed in the Inventory Hub’s Cutboard Fuse.  To create a new recipe, simply enter your recipe name at the top of the cutboard, then you can begin adding ingredients by searching your ingredients, batch recipes, and yields in the box to the left of the cutboard.  Select the green plus sign to the right of the ingredient to add it to the cutboard.  

Once ingredients have been added to the cutboard, users can edit the amount used and the unit of measurement for each ingredient, which will then be used to show the total cost to make that recipe.  

how-to-create-and-link-recipes-ss-2

Above is an example recipe for a Basic Burger that has 8 ounces of ground beef and a bun (we know that this particular bun is 3.5 ounces from the invoice information, which can be viewed below each ingredient in the add ingredients box to the left) which results in a total recipe cost of $1.75.  

To save a recipe and link it to a menu item, below the cutboard select “Save As” then select “Plate Recipe.”  The Select Associated POS Item dialog box will appear.  Locate the menu item that you wish to link your recipe to, select it, then select Link.  

how-to-create-and-link-recipes-ss-3

Your linked recipe will then appear at the bottom of the page under “Plate Recipes.”  If it does not appear right away, please refresh your page.  

how-to-create-and-link-reicpes-ss-4

Once a recipe has been linked to a menu item, users can view plate costing analytics for the menu item in the Inventory Hub’s Menu Fuse.  

how-to-create-and-link-recipes-ss-5


How to Create a Custom Menu Item

how to create custom menu items ss 1.png

Dashboard -> Inventory Hub -> Menu Fuse -> Edit Menu -> Categories

To create a custom menu item, go to the Inventory Hub, then go to the Menus fuse.  

In the top right you can select “Create Menu Item” to create a custom menu item.  The Custom Menu Item dialog box will appear.  You can then specify the Name, POS ID, Category, and Price Sold At for the custom menu item.  

how-to-create-custom-menu-items-ss-2

Once a custom menu item has been created, it will appear in the Menus fuse, and you can link a recipe to it to enable plate costing features.  

If you do not know how to link a menu item to a recipe, please see the tutorial on “How to Create and Link Recipes.”

Inventory Price Trends Fuse Overview

invenotry price trends fuse overview ss.png
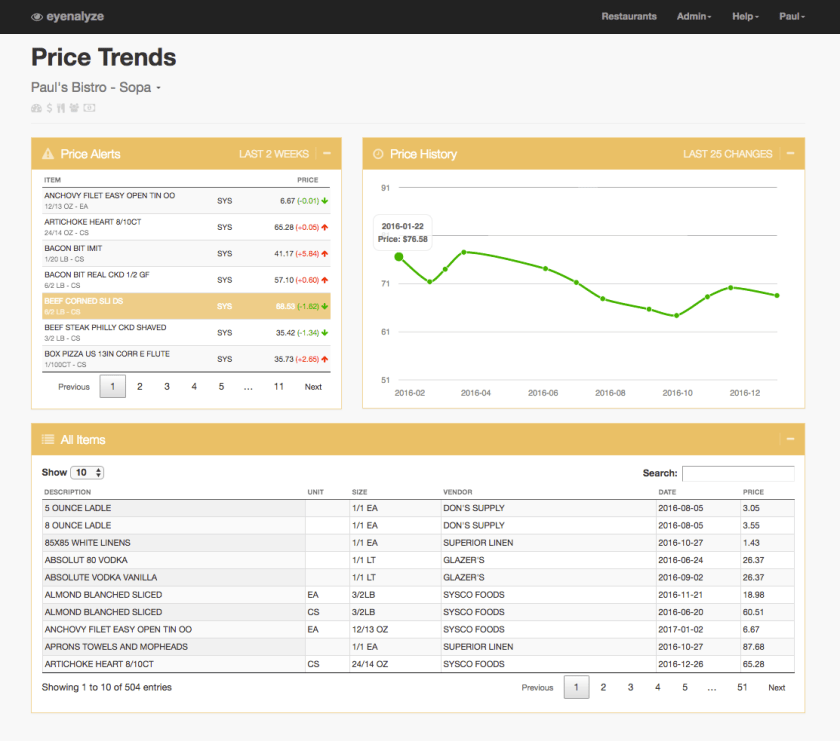
The Price Trends fuse is located in the Inventory Hub, and it tracks the changes in price of your vendor items as they appear in Eyenalyze.

The Price Alerts box shows your inventory items in alphabetical order from the past two weeks.  you can see the item, vendor, and what the price is currently compared to what the price was before it changed to the current price.

The Price History box shows a graphical representation of the last 25 changes in price for a specific item.  Some item’s price does not change often and will have only a few price dots on the graph, while other item’s price changes constantly and will have many dots on the graph.

Note that this graph does not show the quantity or how often an item is ordered.  This graph only shows each time that the price for specific items have changed

The All Items box shows all of the items that have been ordered and information for each item including the date of the last invoice it was ordered on and the current price of the item based on the last invoice.

Profit Hub Overview

profit hub overview ss.png

Within Eyenalyze there are four hubs used to manage your restaurant.  In this tutorial we will be focusing on the Profit Hub, represented by the color green.  

On the Dashboard, the Profit Hub shows your estimated bottom line for the designated date range.  You can navigate to the Profit Hub by clicking the Profit header, or you can access a specific fuse within the Profit Hub directly by clicking the chevron drop down menu, and selecting the desired fuse.  

Within the profit hub there is the Profit & Loss fuse, the Fixed Costs fuse, and the Reports fuse.  

The Profit & Loss fuse breaks down your restaurant’s profitability and gives you an estimated bottom line for your restaurant.  

The Fixed Costs fuse allows users to manage fixed costs for their restaurant.  

The Reports fuse allows owners and managers to create robust reports for their restaurant.  There are various graphs and summaries you can choose to generate a report for.

Below the Profit fuse panel you can view your restaurant’s estimated bottom line for yesterday, the last 7 days, and the last 30 days, along with a graphical representation of the sales and costs for your restaurant.  

How to Export Payroll

Eyenalyze makes exporting your payroll  that is pulled from your point of sales system simple and easy.  If you have not set up your payroll, or ensured that payroll ID’s are assigned to your employees, please view the tutorials on how to do so before exporting your payroll.

Dashboard -> Labor Hub -> Payroll Export

To export your data using Eyenalyze, from the Dashboard, go to the Labor Hub, then select the Payroll Export fuse.  Locate the pay period you would like to export, then press “Select.”  A payroll report will appear showing an overview of the employees receiving pay in this pay period.  You can quickly check if the hours match your point of sales system, and if they do, select “Accept” and choose the format you wish to export your data in.  Select “Download” and the file will download into your downloads folder, which you can then import into your payroll provider’s system.  

How to Assign Payroll ID’s to Employees

Before assigning payroll ID’s to employees, it is important that you have set up your payroll process in Eyenalyze.  If you have not done so, please view the tutorial on How to Setup Payroll. 

Before exporting your payroll to a payroll provider, such as Proliant, it is important to make sure that every employee receiving hours has a payroll ID assigned to them.  This is important to ensure that your payroll exports correctly.  

The point of sales system is the driving force for payroll, so we advise you to edit your pay rates on your point of sales system, and let it automatically populate Eyenalyze to keep your information consistent on both.  

Dashboard -> Labor Hub -> Payroll Export -> Switch view to Payroll ID

What is important to check on Eyenalyze is that every employee that receives hours has a payroll ID.  You will have to enter these on the Eyenalyze system.  The best way to determine if someone is receiving hours but does not have a payroll ID is to go to your Labor Hub, and go to the Payroll Export fuse.  Here you can select a specific payroll export.  Switch the view to Payroll ID, and here you can see which employees are receiving hours but lack a Payroll ID.  Make a quick list of anyone that does not have a Payroll ID, then go back to the employees fuse, locate those people, and assign a payroll ID to them.

Once you have set up your payroll, and assigned payroll ID’s to your employees, you will be ready to export your payroll.  If you do not know how to do so, please view the tutorial on How to Export Payroll.  

How to Setup Payroll

how to setup payroll ss.png

Eyenalyze provides an easy to use payroll system that pulls payroll information from your point of sales system, and enables you to view and edit your payroll directly through Eyenalyze.  

Dashboard -> Labor Hub -> Settings

To set up your payroll parameters, from the dashboard go to the Labor Hub, then go to Settings.  In the General Section you can set up your overtime rate, and when you would like Eyenalyze to give you an overtime notification if you choose to do that.  

In the Payroll section you can choose your payroll provider.  For this example we will use Proliant.  You can specify your payroll tax which Eyenalyze will use to calculate your labor costs on the Dashboard.  You can select which pay period you use for your restaurant, and as you change your pay period, the options to customize your pay period will change below.  For example if you use a bi-monthly pay period, you can select which date range you would like to use for your pay period.  

In the Employees section you can view all of your employees present in your point of sales system.  Here you can view whether an employee is on a salary, or paid hourly.  You can also choose to exclude specific employees from your payroll, for example if they have an unpaid or training position, or exclude them cite-wide if they are no longer with you.  

Once you have set up all of these credentials in the eyenalyze system, you can export your payroll from Eyenalyze to your payroll provider.  Before doing so, make sure that you have assigned a Payroll ID to each employee.  If you have not done this, please view the tutorial on How to Assign Payroll ID’s to employees.  

Labor Hub Overview

labor-hub-overview-ss

Within Eyenalyze there are four hubs used to manage your restaurant.  In this tutorial, we will be focusing on the Labor Hub, represented by the color red.

On the dashboard, the Labor Hub shows the labor cost percentage for the designated date range.  You can navigate to the Labor Hub by clicking the labor header, or you can access a specific fuse within the Labor Hub directly by clicking the chevron drop down menu, and selecting the desired fuse.

Within the Labor Hub, there is the Employees, Timesheet, Payroll Export, and Transfers fuse.  

The Employees fuse shows all of your employees along with their job, payroll ID,  and salary or pay rate.  It is common that employees may be listed multiple times depending on if they serve multiple roles for your restaurant.  

The Timesheet fuse by default shows yesterday’s clock in and clock out time, hours, overtime, and tips for each employee.  Like other functions in Eyenalyze, this information can be customized by changing the date range.  

The Payroll Export fuse allows users to export and download payroll information to a payroll provider or in a manual format.  

The Labor Transfers fuse allows users to transfer employees or their individual shifts between restaurants in a chain.  

Below the labor fuse panel you can view your restaurant’s labor cost percentage for yesterday, the last 7 days, and the last 30 days, along with graphical representations for this data.  

How to use the Advanced Accounting View

advanced-view-ss

Eyenalyze offers an Advanced Accounting view which displays a more robust view of the accounting that goes into your restaurant’s data.  If you have already mapped your chart of accounts in the basic view, then you will not need to repeat this step in the advanced view, or you can map your chart of accounts directly using the advanced view.  

Sales -> Quickbooks -> Edit Menu -> Advanced View

To switch to the Advanced Accounting view, go to the Sales Hub, and select Quickbooks.  Then go to the edit menu and select Advanced View.  The first thing you will need to do before you can edit your chart of accounts is unlock the features by clicking the padlock in the top left corner.  The Advanced Accounting page adds three core features that lets you customize how your accounting system operates.  

The first feature is you can edit whether an entry is a debit, credit, or both.  You can do this by dragging the box into the debit or credit square.  You can delete a box by selecting the small “x” in the corner.  

The second feature is the ability to hide items.  This would occur if you are no longer using an item and you do not want it to show in the system or on your balance sheet.  

The third feature is at the bottom you will see total columns for your debits and credits.  These totals should equal out to zero.  We encourage you to involve your accountant or controller in that process so it is accurate.  When you are finished working, go back to the padlock in the top left corner to lock the page, and doing so will save your changes.